Sunday, April 8, 2012

Carrot Cake Cupcakes!


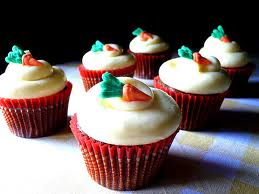
This past weekend, my mother-in-law asked me if I could cover the desserts for our Easter dinner. She works as an executive assistant and her work has been pretty hectic. Of course I responded with, “Absolutely! I'd love to help out!” I was trying to decide what I was going to make and so as I began to look up recipes for Easter desserts, I came across several carrot cake recipes. I’ve never really been a fan of cake with vegetables in it so that’s probably why I didn’t think of it on my own. But the orange color makes it perfect for this holiday. One thing almost stopped me from choosing this dessert – I had never made carrot cake before. My husband warned me that his granny was always saying how hard carrot cake is to make so I was a little scared. But I went with it anyways… and it turned out great! The recipe I chose has pecans and no raisins. I personally don’t like raisins but you could always add them in if you want. Also I found the cutest picture of a carrot cake with little decorative icing carrots on top so I decided to place a little carrot on each cupcake. It was adorable! Here is the recipe I used…

Ingredients

 4 eggs

 1 1/4 cups vegetable oil

 2 cups white sugar

 2 teaspoons vanilla extract

 2 cups all-purpose flour

 2 teaspoons baking soda

 2 teaspoons baking powder

 1/2 teaspoon salt

 2 teaspoons ground cinnamon

 3 cups grated carrots

 1 cup chopped pecans


 1/2 cup butter, softened

 8 ounces cream cheese, softened

 4 cups confectioners' sugar

 1 teaspoon vanilla extract

 1 cup chopped pecans


Directions

1. Preheat oven to 350 degrees F (175 degrees C). Place cupcake liners in a muffin pan.

2. In a large bowl, beat together the eggs, oil, white sugar and 2 teaspoons vanilla. Mix in flour, baking soda, baking powder, salt and cinnamon. Stir in carrots. Fold in pecans. Pour into prepared pan.

3. Bake in the preheated oven for 20 to 25 minutes, or until a toothpick inserted into the center of the cupcakes comes out clean. Let them cool in the pan for 10 minutes, then turn out onto a wire rack and cool completely.

4. To Make Frosting: In a medium bowl, combine butter, cream cheese, confectioners' sugar and 1 teaspoon vanilla. Beat until the mixture is smooth and creamy. Stir in chopped pecans. Frost the cooled cake.

 I chose to forego the pecans in the icing since they were already in the cake batter but you can always add them in the icing too if you wish. I hope you enjoy!

(For the decorative carrots, I just whipped up some orange and green icing and used an icing bag to pipe them on.)

Sunday, April 1, 2012

White and Dark Cookies


Today we had my in-laws over for lunch after church. We had barbecue chicken, corn, and some potatoes. So I was trying to think of the perfect dessert for this menu. Since I had to be in church Sunday morning, I knew I’d have to bake this dessert the night before. I decided to keep it simple and go with cookies. I ransacked my pantry to see what options I had for cookies. I immediately saw some white chocolate chips and thought white chocolate macadamia nut cookies! I proceeded to make these cookies and when I got to the part where I fold in the nuts and chips, I realized I had no macadamia nuts! So I went back to the pantry and found some semi-sweet chocolate chips. I decided to throw those in and see how they turned out. I have to admit I felt like a professional chef changing up this recipe. They were delicious! The white chocolate chips were super sweet and the semi-sweet chips gave that cocoa flavor. They were absolutely to die for! So I’m going to share the recipe with you with the changes I have made…

Ingredients:

1 cup butter, softened

3/4 cup packed light brown sugar

1/2 cup white sugar

2 eggs

1/2 teaspoon vanilla extract

1/2 teaspoon almond extract

2 1/2 cups all-purpose flour

1 teaspoon baking soda

1/2 teaspoon salt

1 cup semi-sweet chocolate chips

1 cup white chocolate chips


Directions:

Preheat oven to 350 degrees F (175 degrees C).

2. In a large bowl, cream together the butter, brown sugar, and white sugar until smooth. Beat in the eggs, one at a time, then stir in the vanilla and almond extracts. Combine the flour, baking soda, and salt; gradually stir into the creamed mixture. Mix in the semi-sweet chocolate and white chocolate. Drop dough by teaspoonfuls onto ungreased cookie sheets.

3. Bake for 10 minutes in the preheated oven, or until golden brown.

As always, make sure you use room temperature eggs. Also, these cookies are not going to spread out as much as most cookies do, so try not to make the cookie dough balls too big. Hope you all enjoy!

Monday, March 26, 2012

White Chocolate Bark


This week I chose to share a dessert that anyone can do! It is super simple, and very versatile. You can mix up the ingredients to whatever you or your familiy likes. So what dessert am I talking about? It’s white chocolate bark! This recipe is candy making made simple. You certainly don’t need a forensic scientist to accomplish this one. This is also a great recipe that you can use when you want your kids to help out in the kitchen! For my recipe, I use pistaccios, dried cranberries, and apricots. These give great color and I think they taste great. However, if your kids won’t eat apricots, you can definitely change out these ingredients to suit your needs. Speaking of kids, this is a great way to get them to eat some fruits that they normally would not because they are in a big bar of white chocolate. They probably will not even notice. So let’s talk about how to make these…

Preheat the oven to 350 degrees F. Using a pencil, draw an 8 by 10-inch rectangle on a piece of parchment paper placed on a sheet pan. Turn the parchment paper over so the pencil mark doesn't get into the chocolate.

Place the pistaccios in 1 layer on another sheet pan and bake for 8 minutes. Set aside to cool and then chop roughly into large pieces. You can do this with whatever nut you decide to use.

Place 3/4 of the chocolate in a glass bowl and place it in the microwave on high power for 30 seconds. Stir with a rubber spatula. Put it back in the microwave for another 30 seconds and stir again. Continue to heat and stir every 30 seconds until the chocolate is just melted. Immediately, add the remaining chocolate and allow it to sit at room temperature, stirring often, until it's completely smooth. (If you need to heat it a little more, place it in the microwave for another 15 seconds at a time.) This is called tempering chocolate.

Pour the melted chocolate onto the parchment paper and spread it lightly into the drawn rectangle. Sprinkle the top evenly with the cooled pistaccios, the cranberries and apricots. Set aside for at least 2 hours until firm, or refrigerate for 20 minutes. Cut the bark in 16 pieces and serve at room temperature.

How simple was that? I hope you turn to this recipe the next time you want a simple candy recipe!

Sunday, March 18, 2012

Strawberry Shortcake


In the town that I live in the weather has been beautiful here lately.  Although its only March, it feels like its summer outside. All of this warm sunshine has been making me crave my favorite summer desserts, so I decided to dig out a recipe and whip one up. I chose to make my favorite strawberry shortcake. You don't need to be a nutritionist to know this isn't the most healthy cake, but it is one that I promise you'll enjoy. Besides, everyone needs to indulge now and then. This cake is moist and delicious. It’s the perfect treat for a hot summer day. (Or a day in March when its 78 and sunny!)

Here is the recipe…

Ingredients:

3 pints fresh strawberries

 1/2 cup white sugar

 2 1/4 cups all-purpose flour

 4 teaspoons baking powder

 2 tablespoons white sugar

 1/4 teaspoon salt

 1/3 cup shortening

 1 egg

 2/3 cup milk


Directions:

1. Slice the strawberries and toss them with 1/2 cup of white sugar. Set aside.

2. Preheat oven to 425 degrees F (220 degrees C). Grease and flour one 8 inch round cake pan.

3. In a medium bowl combine the flour, baking powder, 2 tablespoons white sugar and the salt. With a pastry blender cut in the shortening until the mixture resembles coarse crumbs. Make a well in the center and add the beaten egg and milk. Stir until just combined.

4. Spread the batter into the prepared pan. Bake at 425 degrees F (220 degrees C) for 15 to 20 minutes or until golden brown. Let cool partially in pan on wire rack.

5. Slice partially cooled cake in half, making two layers. Place half of the strawberries on one layer and top with the other layer. Top with remaining strawberries and cover with the whipped cream.

Here’s a tip – You don’t really need a pastry blender to cut the shortening into the mixture. Just use a regular old butter knife. It will do the trick!

Hope you all enjoy!

Monday, March 12, 2012

Orange Pound Cake

This past week was my sister's birthday and as her gift I made her favorite dessert - orange pound cake! She is a police officer and she took some into work. She said everyone at the station loved it! This is a recipe that I have used for many years now. It is just a regular pound cake with the added orange flavor. So it’s super easy to make! Here is the recipe…

Ingredients
1/2 pound (2 sticks) unsalted butter, at room temperature
2 1/2 cups granulated sugar, divided
4 extra-large eggs, at room temperature
1/3 cup grated orange zest (6 oranges)
3 cups all-purpose flour
1/2 teaspoon baking powder
1/2 teaspoon baking soda
1 teaspoon kosher salt
3/4 cup freshly squeezed orange juice, divided
3/4 cup buttermilk, at room temperature
1 teaspoon pure vanilla extract


To glaze one loaf (optional):
1 cup confectioners' sugar, sifted
1 1/2 tablespoons freshly squeezed orange juice

Directions
 Heat the oven to 350 degrees. Grease and flour two 8 1/2 x 4 1/2 x 2 1/2-inch loaf pans. Line the bottoms with parchment paper.
Cream the butter and 2 cups of the granulated sugar in the bowl of an electric mixer fitted with the paddle attachment for about 5 minutes, or until light and fluffy. With the mixer on medium speed, beat in the eggs, one at a time, and the orange zest.
 In a large bowl, sift together the flour, baking powder, baking soda, and salt. In another bowl, combine 1/4 cup of the orange juice, the buttermilk, and vanilla. Add the flour and buttermilk mixtures alternately to the batter, beginning and ending with the flour. Divide the batter evenly between the pans, smooth the tops, and bake for 45 minutes to 1 hour, until a cake tester comes out clean.
 While the cakes bake, cook the remaining 1/2 cup of granulated sugar with the remaining 1/2 cup orange juice in a small saucepan over low heat until the sugar dissolves. When the cakes are done, let them cool for 10 minutes. Take them out of the pans and place them on a baking rack set over a tray. Spoon the orange syrup over the cakes and allow the cakes to cool completely.
 To glaze, combine the confectioners' sugar and orange juice in a bowl, mixing with a wire whisk until smooth. Add a few more drops of juice, if necessary, to make it pour easily. Pour over the top of one cake and allow the glaze to dry. Wrap well, and store in the refrigerator.
You may think 1/3 cup of orange zest is a whole lot, and it is, but it’s what gives the cake the great orange flavor. I hope you enjoy this zesty dessert!

Sunday, March 4, 2012

Apple Caramel Crostatas


About a week ago, my husband and I went out to eat at our favorite Italian restaurant. They had a new dessert on the menu that I was dying to try as soon as I saw it. It was an apple caramel crostata, which is basically like apple pie in a bowl. The bowl is lined with flaky, buttery pastry dough and then filled with apples, cinnamon and caramel. It does not get much better than that. So I tried it and it was delicious. Then I got home and of course, had to re-create in my own kitchen. The lady that had been sitting next to us at the restaurant just happened to be an aspiring pastry chef and she shared with me the two things that I should include to make this specific crostata. So I used my favorite apple pie recipe and tweaked it.  I didn’t change the pastry dough. But I added the two things to the filling that make this dessert perfect… orange zest and caramel. Here is the recipe:


Ingredients


For the pastry:

1 cup all-purpose flour

2 tablespoons granulated or superfine sugar

1/4 teaspoon kosher salt

1/4 pound (1 stick) very cold unsalted butter, diced

2 tablespoons ice water


For the filling:

1 1/2 pounds McIntosh, Macoun, or Empire apples (3 large)

1/4 teaspoon grated orange zest

1/4 cup flour

1/4 cup granulated or superfine sugar

1/4 teaspoon kosher salt

1/4 teaspoon ground cinnamon

1/8 teaspoon ground allspice

4 tablespoons (1/2 stick) cold unsalted butter, diced

2 tablespoons caramel sauce


Directions

For the pastry, place the flour, sugar, and salt in the bowl of a food processor fitted with a steel blade. Pulse a few times to combine. Add the butter and pulse 12 to 15 times, or until the butter is the size of peas. With the motor running, add the ice water all at once through the feed tube. Keep hitting the pulse button to combine, but stop the machine just before the dough becomes a solid mass. Turn the dough onto a well-floured board and form into a disk. Wrap with plastic and refrigerate for at least 1 hour.

Preheat the oven to 450 degrees F.

Flour a rolling pin and roll the pastry into an 11-inch circle on a lightly floured surface. Transfer it to a baking sheet.

For the filling, peel, core, and cut the apples into 8ths. Cut each wedge into 3 chunks. Toss the chunks with the orange zest. Cover the tart dough with the apple chunks leaving a 1 1/2-inch border.

Combine the flour, sugar, salt, cinnamon, and allspice in the bowl of a food processor fitted with a steel blade. Add the butter and pulse until the mixture is crumbly. Pour into a bowl and rub it with your fingers until it starts holding together. Sprinkle evenly on the apples. Drizzle the caramel sauce over the apples. Gently fold the border over the apples to enclose the dough, pleating it to make a circle.

Bake the crostata for 20 to 25 minutes, until the crust is golden and the apples are tender. Allow to cool. Serve warm or at room temperature


…and there you have it! A delicious, restaurant worthy dessert that is sure to please anyone!

Sunday, February 26, 2012

Double Dark Chocolate Cupcakes

This week's desserts is one for the chocolate lovers! It is a decadent, rich dark chocolate cupcake, topped with a semi-sweet chocolate frosting. You have to be a true chocoholic to enjoy this one. Paired with some strawberries or raspberries, this dessert would be perfect for anytime! Here is the recipe:

Ingredients:

Cupcakes:
1 1/8 cups all-purpose flour
1/4 cup Unsweetened Cocoa
1 1/4 teaspoons baking soda
1/4 teaspoon salt
1 large egg
1/2 cup firmly packed light brown sugar
1/2 cup granulated white sugar
1/2 cup whole milk plus
2 tablespoons whole milk
1/3 cup strong brewed coffee or espresso
1/2 cup unsalted butter, melted
Frosting:
6 ounces Semi-Sweet Chocolate baking bar, broken or chopped into 1-inch pieces
3/4 cup heavy cream
3 tablespoons unsalted butter
1 cup Milk or Semi-Sweet Chocolate Chips

Directions:
Preheat the oven to 350 degrees F. Line 12 cupcake molds or muffin tins with paper liners or spray with nonstick spray.            
To make the cupcakes, sift together the flour, cocoa, baking soda, and salt.           
In a medium bowl, whisk together the egg, brown sugar, and white sugar. Whisk in the milk, coffee, and melted butter. Whisk in the dry ingredients. Divide the batter evenly among the cupcake molds, filling them about three-quarters full.               
Bake for 15 minutes, or until a tester inserted in the middle of the cupcakes comes out clean. Cool for 10 minutes. Using a small spatula or knife, remove the cupcakes from the pan. Continue to cool on a wire rack to room temperature.
To make the frosting, melt the chopped chocolate in the top of a double boiler, or in a heatproof bowl, over barely simmering water, stirring occasionally until smooth. Heat the cream until hot. Remove from the heat and whisk in the chocolate. Transfer to a bowl and cool to just warm. Whisk in the butter until smooth. Let sit until it reaches a spreading consistency, about 1 hour. Spread the frosting on top of the cupcakes. Sprinkle them with chocolate chips.               

The component that really makes this dessert special is the coffee. This is a trick I use anytime I'm baking with chocolate. The coffee really brings out the taste of the chocolate. I hope this dessert is perfect for you!

Tuesday, February 14, 2012

Homemade Ice Cream Recipes


For our wedding, my husband and I received an ice cream maker. It sat in our pantry for the past six months and to be honest I completely forgot we had it. But the other day I was digging around my pantry looking for something else and I stumbled upon our ice cream maker! It hadn’t even been removed from the box yet. So I unpackaged it and plugged it in. It came with a book of ice cream recipes but they are very simple and not very impressive. So I decided to experiment a little with my own ice cream creations. I’m going to share with you the top recipes that I have tried and found to be delicious!

#1: Caramel Macchiato Ice Cream. How good does that sound?! This ice cream is sooo good! I was inspired by a drink at my favorite coffee vendor.  I love it because while it’s very sweet, it’s also kind of salty. These two combined make this an amazing recipe! So here it is…

Ingredients: 1 cup milk, 2 tablespoons instant coffee granules, 1 cup white sugar, 1 pinch salt, 2 cups heavy cream, and ¾ cup caramel dessert cause.

Directions: Mix milk, coffee, sugar, and salt in a large bowl until sugar is dissolved. Add in the heavy cream and chill mixture for 2 hours. Pour into ice cream maker and freeze according to manufacturer’s directions. Pour caramel sauce over finished ice cream and enjoy!


#2: Banana Walnut Ice Cream. This is a delicious, unique ice cream that is perfect for the summer months! It would be perfect with a slice of banana nut bread. Here’s the recipe:

Ingredients: 2 ½ cups half and half, 8 egg yolks, 1 cup white sugar, 2 ½ cups heavy whipping cream, 2 bananas, ¾ cup half and half, 1 cup walnuts

Directions: Heat 2 ½ cups half and half over medium heat. Meanwhile mix 8 egg yolks and sugar in a bowl. Add mixture to the half and half and continue to heat. Stir in heavy whipping cream. Puree the bananas and the ¾ cup half and half in a blender until smooth. Combine banana mixture and egg mixture in a bowl and refrigerate for 3 to 4 hours. Pour into ice cream maker and freeze according to manufacturer’s directions.


These recipes are great for you to start making your own ice cream. Then once you master them, it’s very easy to create your own masterpieces! You don’t need to become a forensic scientist to figure this one out. You simply take some milk, cream and sugar and add in whatever you want to flavor your dessert! Good luck to you in all your creations!

Sunday, February 12, 2012

Top 3 Ways To Spice Up Boxed Cake Mix

So tonight my husband and I celebrated Valentine’s Day a little early. We went to dinner and saw a movie. After the movie we were heading home and both really were in the mood for something sweet. With me being an avid baker, I can’t bring myself to pay 8 dollars for a dessert I can make myself, so baking at home was our only option. We stopped by our local grocery store and tried to agree on which sweet treat we were going to make. I decided that it was late and I didn’t feel like using my mixer and having to clean it so we bought a boxed mix. This is something I usually try to avoid but I have found that boxed desserts can be really good if you know what to add to them. Here are the top five things I have found to spice up ordinary boxed up mixes…
#3: Food coloring: This is something that doesn’t affect the taste of the food, obviously, but it can make it look much more appealing. (This is especially true on a night like tonight.) Taking a white cake mix and tinting it pink would have been a perfect touch to our Valentine’s Day dessert!
#2: Candy: This is one you have to be careful with because candy can alter the batter in a way that will affect the way it bakes. Try to stick to larger pieces of candy. For example, when making cupcakes, rather than chopping up a bunch of peanut butter cups and throwing them in the batter, just place one whole peanut butter cup in the middle of the cupcake.
#1: Extracts: These can completely change the way a dessert tastes. Once again, you have to be careful with them because a little goes a long way. But the next time you make a cake and use store bought icing, just place a few drops of your favorite extract in the icing and you will have homemade tasting icing in a snap!
Now you have the resources to make the most boring cake mix into a masterpiece!

Sunday, February 5, 2012

Top Five Romantic Desserts


Valentines Day is just around the corner, and there is nothing more romantic and sweet than making dessert for your special someone. For this week I’ve decided to share with you the top five romantic desserts for you and your honey to share on Valentine’s Day.

#1: Chocolate Covered Strawberries: The most simple and yet the most classic V-day desserst. I am an RN and my time is precious so this one is definitely my favorite. All you need for this one is 16 oz of semi-sweet chocolate chips, 2 tablespoons of shortening and a pound of strawberries. Just melt the chocolate and shortening in a double boiler. Stick the strawberries on some toothpicks and let the fun begin!

#2: White Chocolate Raspberry Cheesecake: Just the name of this dessert has my mouth watering. What’s better than chocolate, fruit AND cheesecake? Yum! This one is a bit more complicating but so much more decadent. Click the name for the recipe.

#3: Oreo Balls: So the name of this one doesn’t sound quite as romantic, but these rich chocolate balls are such a cute dessert! Just grind up a pack of Oreo cookies with an 8 oz. block of cream cheese and roll into balls. Dip them in melted white chocolate and let cool. For this specific holiday, you could tint the white chocolate with red food coloring for a perfect Valentine’s Day treat!

#4: Nutty Caramel Clusters: If you’re someone who doesn’t like super sweet desserts, this one is for you. Don’t be fooled by how impressive they look, they are a breeze to make! Click the name for the recipe.

#5: Irish Cream Creme Brulee: With only 5 ingredients, this is a dessert that is super simple, yet looks very elegant. It’s an adult twist on a classic dessert! Click the name for the recipe.

So there you have it. Five great dessert options to make your Valentine’s Day dinner one to remember!

Tuesday, January 17, 2012

Sweetheart Whoopie Pies

Valentines Day is just around the corner and so I decided to let that inspire this week's baked goodie! I was talking to one of my friends who is an administrative assistant about what the perfect dessert for this holiday would be and we found it! They are red and cute and sweet and so perfect for this holiday!! These mini sandwiches are basically just red sugar cookies filled with a sweet buttercream icing. They are easy to create and will be the perfect addition to any Valentines Day present.

Here's the recipe:

For the cookie dough:

Ingredients:
4 cups sifted all purpose flour
2 teaspoons baking powder
1 1/2 cups sugar
2 eggs
3/4 cup butter (1 1/2 stick)
2 teaspoons vanilla extract
Heart shaped cookie cutters

Directions:
Preheat oven to 350 degrees F.
In a bowl, stir together flour and baking powder. In another bowl, beat butter with sugar until fluffy and light. Beat in eggs and vanilla. Stir in flour mixture, a third at a time to make a stiff dough. Divide dough into 4 pieces. Roll out a portion of cookie dough to 1/4 inch thick. Cut out heart shapes using cookie cutters. Place on lightly greased or nonstick cookie sheets. Bake until lightly golden, about 10 minute, rotating baking sheet halfway through cooking time. Cool completely on pans about 5 minutes, transfer to cooling racks and cool completely before decorating.
For the icing:
Ingredients:
1/2 cup confectioners’ sugar
1 1/2 tablespoons water
3 to 4 drops red food coloring, plus more as needed until you get the red color you want

Directions:
In a small bowl, mix sugar and water to form a thick, smooth icing. Stir in food coloring to reach desired shade.

To assemble the cookies, just take one heart shaped cooke and turn it upside down. Pipe a small amount of icing around the edges of the cookie. Take another red cookie and place it on top.

See? Soo simple! These cookies are so cute and will make anyone you give them to feel good because you made them yourself!

Sunday, January 15, 2012

Butter Pound Cake


This past week was my aunt's birthday and it is a tradition every year that I make her a pound cake. It's her favorite kind of cake! This is the recipe that I have used every year since I began making these for her and I haven't changed it a bit! Pound cake is great to make in a hurry because it doesn’t use many ingredients and you don’t have to worry about icing! This recipe, specifically, makes a rich, dense cake – it is the perfect pound cake!


Here is the recipe...

Ingredients

  • 1 cup butter
  • 6 eggs
  • 3 cups white sugar
  • 3 cups all-purpose flour
  • 1 pint heavy whipping cream
  • 1 tablespoon vanilla extract
  • 2 teaspoons lemon extract

Directions

  1. Preheat oven to 325 degrees F (165 degrees C). Grease and flour one 9 or 10 inch tube pan.
  2. With an electric mixer, cream butter and sugar until fluffy. Add eggs, one at a time and mix well.
  3. Introduce the flour, one cup at a time while adding cream a little at a time until all flour and cream is mixed in well.
  4. Add the vanilla and lemon flavoring and blend well. Pour batter into prepared pan.
  5. Bake at 325 degrees F (165 degrees C) for 1-1/2 hours or until center springs back from small amount of pressure. Immediately turn out on cake rack to cool.

Some tips to remember when making this cake:

  • This recipe makes 14 servings. You can modify for however many servings you need.
  • Use name brand sugar. This may sound kind of odd. But name brand sugar is usually ground differently that store brand sugar. The generic sugar is generally more finely ground which leads to more sugar per cup, which can cause the cake to fall (and nobody wants that!)

Monday, January 9, 2012

Calhouns Banana Pudding


Where I live, there is a restaurant called Calhouns. It's not a national restaurant so they aren't everywhere. They have a dessert on their menu that is an absolute decadence. The first time I ordered it, I thought it would be some pudding, vanilla wafers and bananas. But what the waiter brought to my table was sooo much better. While it was a simple southern dessert - banana pudding,  they had definitely put a spin on it. Instead of pudding mix, they used cheesecake filling mix. Instead of vanilla wafers, they used white chocolate chip macadamia nut cookies! It took me a while, but I got the recipe. So here it is...


Ingredients:

16 oz. Instant cheesecake filling
5 cups Milk
1 1/2 oz. Whipping cream
13 Macadamia Nut Cookies
5 Large 
bananas (peeled & sliced in 1/4" discs)
3 cups Chantilly cream

Directions:


Mix the instant cheesecake mix with milk and whole whipping cream
Refrigerate to set.

Break cookies into pebble sized pieces and line the bottom of a 2" line pan with 18 of them

Put the filling on top of the cookies spreading it evenly gently without shifting the crumbs

Evenly distribute banana slices over pudding
Break up seven more of the cookies and evenly distribute them over the banana slices
Top with Chantilly cream. Cover and refrigerate before serving


This recipe is so easy. You don’t need a degree in forensic science to figure it out. It's basically just building the layers. But it is sooo yummy! The recipes are common, everyday products. For those of you who don’t know what Chantilly cream is, let me explain. It is a French cream used to fill pastries. You only need three ingredients to make this cream: heavy cream, white sugar, and vanilla extract. Just put them in a mixing bowl and beat on high speed until soft peaks are formed.